Netegriti EM-500AG
Introduction
If you’ve already read my review of the Sony TR1AP, then you’ll know how much I like it and how it’s worked really well for me. Although I did praise the little system, I did have my reservations with the lack of integrated bluetooth and the lack of other built-in wireless options (namely, 802.11a and 802.11g) despite these features being available in other markets.
That fact gnawed at me for a long time as I figured that the systems sold in other markets could not possibly be that different and simply had slightly different OEM parts installed. With that in mind, I spent the last couple of months researching if it would be possible to change the Intel PROWireless 2100 802.11b chipset in my TR to something else. While I found 802.11b fine for my everyday tasks, I did find it somewhat limiting when I was working on DV projects or wanting to transfer JPEGs, MP3s, DV-AVIs, or MPEGs to my server on the network. 802.11b’s 5.5Mbps maximum throughput makes you go and brew a pot of coffee and doing two loads of laundry when you’re transferring GB-sized files. Even though 802.11g’s 54Mbps only really gives you around 20Mbps, that’s a whole lot better at nearly 4x the performance.
Intel’s PROWireless chipset is an extremely popular solution due to its low price and the associated Centrino-brand marketing. This was a good thing as since it made researching and finding specifications a lot easier. As I discovered, the PROWireless chipset typically comes in the “industry standard†miniPCI slot used in almost every single notebook/laptop sold on the market. I also quickly found out that it wasn’t as simple as swapping out the chip for another.
What were the complications? First of all, miniPCI cards come in different sizes. The two most prevalent types are Type 3A and Type 3B (also denoted as IIIA and IIIB). The Type 3A size is defined as being 50.95mm x 59.75mm x 4.90mm (max) while the 3B size is defined as 44.60mm x 59.75mm x 4.90mm (max). So, the 3A cards are bigger than 3B cards. So, luckily, I knew that my Sony TR had a Type 3B PROWireless 2100 because the driver description actually displayed what type it was. The second complication was actually finding a Type 3B 802.11g miniPCI card. Apparently Type 3A cards are extremely popular and readily available in B/G and A/B/G models. What makes the situation worse is that a lot of stores selling miniPCI wireless Ethernet cards do not always publish the type of card or simply do not know.
After much searching, I found a place called Discountechnology.com that sells various computing items on eBay. They were selling a “Netegriti 802.11a & 802.11b & 802.11g Mini PCI Combo Card - WiFi Certified! Up to 108Mbps.†What immediately intrigued me was the fact that this card supported all of the wireless standards and security protocols. Of course, the first thing I did was find out the size of the card. I even e-mailed the company to make sure it was the right item. The company confirmed that it was a Type 3B miniPCI card and I immediately ordered. Discountechnology was very knowledgeable and shipped the product very quickly (with tracking number) so they get good marks in my book.
Ordering and receiving the product was one thing but installing it was a whole other issue. There was little to no information on what was involved in taking apart the Sony TR. Many people discussed the possibility but no one actually seemed to try it. Luckily for all TR owners, Doug, a member of the Yahoo Groups Sony TR group actually took a stab at it and took pictures as well. In addition, another enterprising individual ordered and scanned in the Sony TR1-series service manual (which actually didn’t help at all) which made me think that breaking into my TR wouldn’t be too bad of an ordeal. I felt more confident getting into the machine knowing that others had done so already.
The end result of this whole experiment is that I was successful in turning my Sony TR1AP with plain old 802.11b into an improved model with 802.11a and 802.11b/g without any installation problems and markedly improved performance.
EM-500AG
The EM-500AG is actually made by Wistron, a Taiwanese OEM/ODM company that makes components and systems for other better known companies. The full specifications of the card can be found at http://www.wneweb.com.tw/wireless/products/w-em500ag.htm
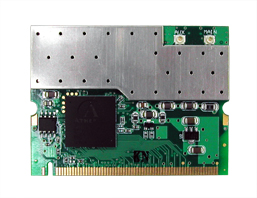
In terms of the specifications, I was happy to know that it used an Atheros chipset since they are well known and generally have good transmission speeds and good driver support. WPA support was also a plus since it’s the security you should be using if you’re not already using it when using Wi-Fi.
How I Did It
First of all, before I start. Please know that this procedure is not for everyone. I do not take any responsibility if you damage your system in any way. If you are not experienced with tinkering with computers and using the proper tools and grounding techniques then I suggest you take a lot of care if you try to follow these instructions.
The first thing you will need is a thin flat head screwdriver, two Philips screwdrivers (one small and one really small) and a pair of needle-nosed pliers.
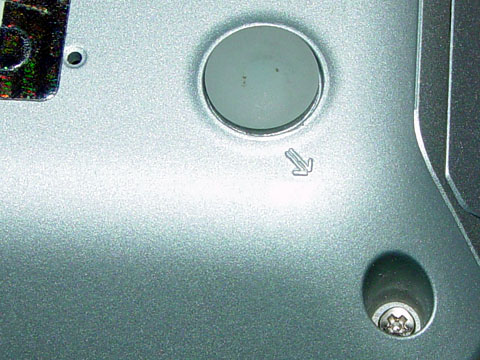
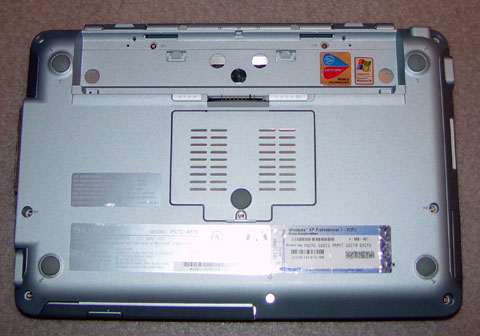
The first step is to remove all of the screws on the bottom of the TR. All of the necessary screws are denoted with the following arrows. You will need to remove two of the rubber feet in order to get to two of the screws. Use the flathead screwdriver to peel them off and place them on a surface where dust will not get on the adhesive part. The adhesive is pretty good and will allow you to stick them back on without too much trouble.
In total, you will remove 13 screws from the bottom of the system. I suggest you remove the screws one by one and place them on a sheet of paper that has the location of where that screw came from. This will help you avoid having stray screws at the end.
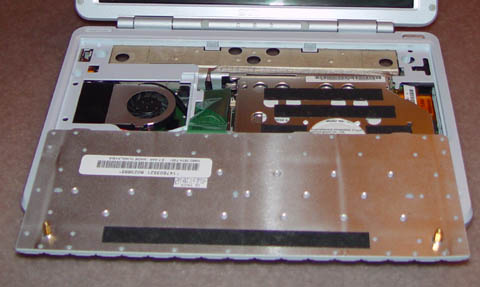
With all of the screws removed you will see two plastic latches in the battery bay. Hold the TR upside down and gentle push the latches upwards and you will feel the keyboard pop outwards.

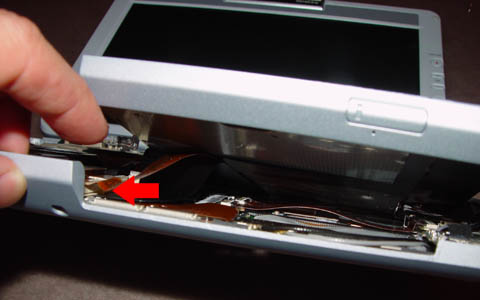
Turn the notebook over and the keyboard will fold over allowing you to see the insides of the system. The keyboard is held in the system via an interface ribbon. Using your flathead screwdriver, lift the brown plastic tab upwards towards you and the interface ribbon will slide out with ease. You can then put the keyboard aside for later.
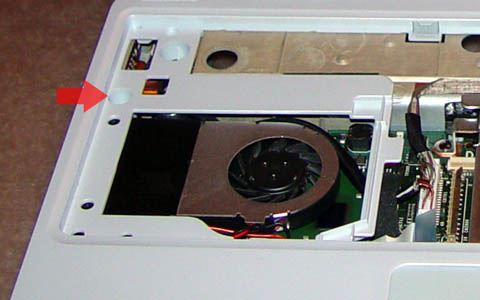
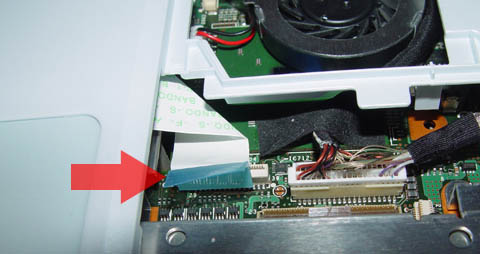
The thing to do is remove one more screw as denoted in this picture. Removing this screw will allow you to remove the rest of the plastic frame and further access the insides of the TR. You must remove one more interface ribbon; however, this ribbon is only pushed in. Gently pull on the blue colored tab and it comes out easily. Now you can remove the frame. The key to getting it off is working on the top part first where the plastic connects to the LCD display.
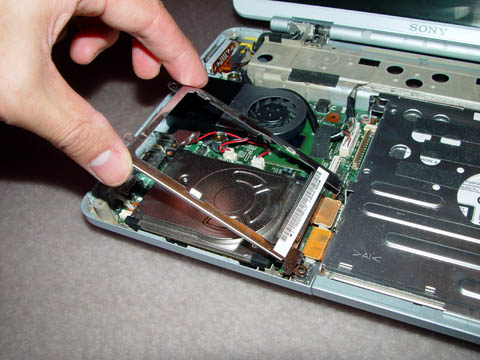
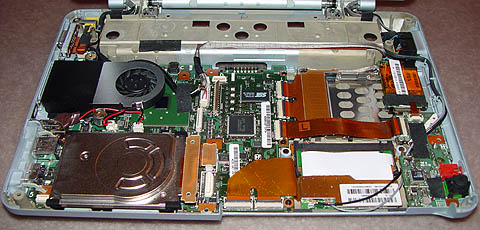
Now that you can see the entire system you have three more screws to remove. These are denoted with the red arrows. These screws are different and require a pretty small Philips head screwdriver to remove them. Two of them hold the frame of optical drive while the third holds the frame for the hard disk drive.
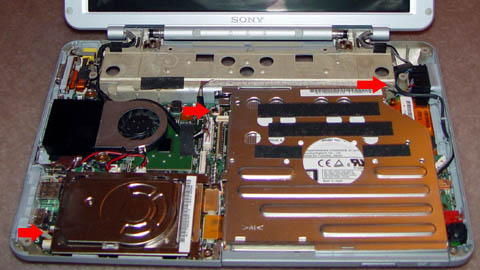
With the screws removed, take out the hard disk drive frame and then follow that with the removal of the optical drive. Gently lift the optical drive upwards and you will see that it too attaches to the motherboard via an interface ribbon. The end of the ribbon is a plug which is easily removed. Unplug the drive and remove the entire unit.
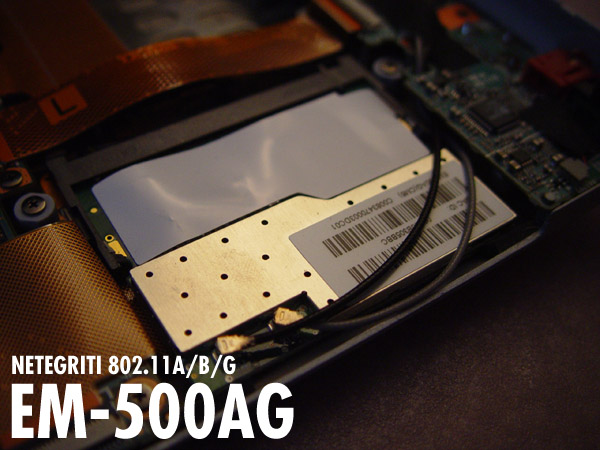
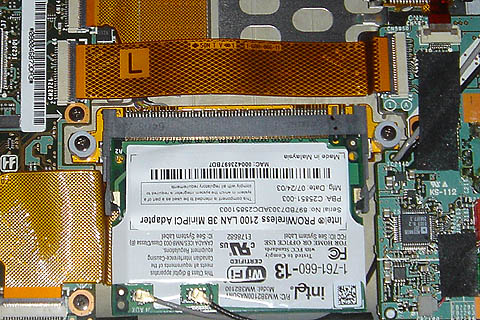
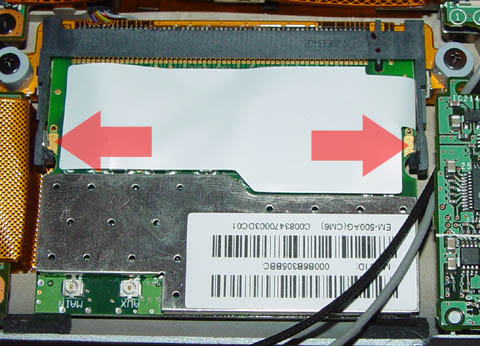
Underneath the optical drive is exactly what we’re looking for. The Intel PROWireless 2100 802.11b miniPCI card. You can even see the “3B” moniker on the card. The first thing you need to do is remove the antenna wires. These will come off with a little bit of wiggling. The black wire is the main antenna wire and the grey is the auxillary wire. You’ll need to remember this for later.
If you installed the memory on your TR then you’ll be familiar with this kind of slot. Pull the two retention clips on the sides and the card will pop-up. Now slide the card out and your ready to install your new card. In the case of the EM-500AG, you’ll notice that it’s a little bigger than the Intel card but it will still fit in the slot.
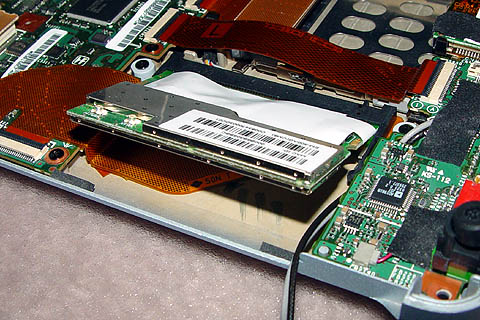
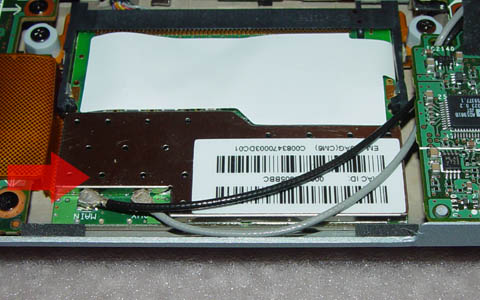
Slide in the new card at the same angle as the previously installed Intel card and make sure you press down firmly to ensure that the contacts are all the way in. Once in, slowly press down on the card so that it clicks back into place with the clips on the side properly holding the new card. Then reattach the antennas (with black for main). You will notice that the antenna no longer go under the card because the newer one is a little bigger. This will force your wires to go on top of the card which is perfectly fine.
With everything happily installed, you now have the fun task of reversing all of the steps and putting everything back the way you found it. Most of the interface cables should be easy to put back. The trackpad one (which is the blue one) just needs a firm push back into place. The keyboard one requires you to stick the ribbon back into the slot and gently push down on the brown lever to lock it into place. Be sure to take your time during this step and make sure everything fits into place nicely. There are plastic guides here and there to help you verify that the pieces are in the right place. Check and double check everything.
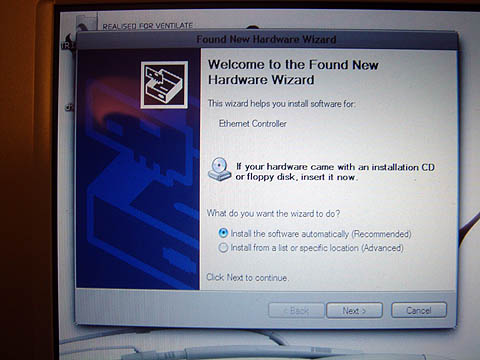
Upon your next boot-up, Windows XP will immediately find new hardware to install and will prompt you for drivers. Drivers for the EM-500AG did not come with card; however, they are readily available from Discountechnology’s website. You can point the installation to the directory where you have the drivers. You will probably want to run the setup program to make sure the accompanying configuration software is installed. This isn’t necessary though as you can configure the card via Windows Zero Configuration but it is highly recommended.
The configuration software is good if you don’t like using Windows Zero Configuration (which really is awful) and you can easily search for access points and setup profiles with appropriate security measures and monitor transmission speed and throughput. It’s much more straightforward and easy to use.
A quick look to the Device Manager shows the adapter nicely installed and visible under the Network tree information. You’ll see the WLAN a+b+g mini-PCI module. Right clicking on the device will allow you to adjust some of the device’s properties but I suggest leaving them at default unless you specifically need to change them. The card works very well as it is.

One nice thing I noticed about the installation is that you do not lose the Wireless On/Off switch functionality. Turning off the the wireless button still shuts off the wireless chip saving battery life if you don’t need to use it.
What I learned and what you should know
So far, I’ve tested this new card on different 802.11b networks (Microsoft, D-Link, Netgear and whatever is used at Starbucks) and one 802.11g network (Microsoft). In all cases, the EM-500AG worked like a charm and supported WEP 128-bit and WPA-PSK where available. I have not yet tried out an 802.11a network as there are none near me and I don’t plan on buying an 802.11a stuff anyways. It’s nice to know that I have it but there’s a small chance that I will ever use it.
The performance has been very good in terms of range. Compared to the Intel PROWireless 2100 at default settings, the wireless range is almost exactly the same if not slightly better in all of the different locations I tested.
In terms of compatibility and stability, I have been extremely happy with the EM-500AG as it has been completely solid and better than my Intel PROWireless 2100 card. I typically never shutdown my system completely and normally use hibernation or standby in lieu of completely shutting down my system. With the Intel PROWireless 2100, I would often have an issue of the wireless not working upon resuming especially if the system resumed in a new wireless network. I would generally have to completely restart the system to resolve the problem. Additionally, my Intel PROWireless 2100 would occasionally drop a connection for no apparent reason and then quickly re-establish a connection. Since the installation of the EM-500AG I have not had any of these problems and can get up and running immediately.
I did run into one issue that baffled and annoyed me. When connected to a Microsoft Home Networking Access Point (MN-700) in G-only mode (highest performance) and with WPA-PSK (256-bit encryption) enabled, performance dropped to a dismal 9.3Mbps. Conversely, with WEP 128-bit enabled performance jumped up to a very acceptable 19.4Mbps. I initially thought it might be some issue with the card but it seems that the access point is the culprit. It’s actually a known issue at Microsoft as other reviewers have seen this issue but no one at Microsoft will admit the problem. I’m planning on testing other 802.11g WPA capable AP/Routers in the future so expect some more insight into this.
In terms of power consumption, I haven’t noticed any noticeable difference compared to the Intel ProWireless 2100 card. I do plan on running some tests in the future to see if there’s an appreciable difference but for now, you’ll have to take my word for it.
In all, it was a success but I’d only recommend the procedure to anyone who needs the extra bandwidth and aren’t currently having and issues with their current solution. If you typically do everyday things like surfing the net, checking e-mail, downloading music, etc. this upgrade most likely won’t help you much. You have to remember that typically, the Internet and your broadband service provider is limiting your throughput. Your home router network is more than fast enough already for the aforementioned tasks. It’s only in network usage are you going to need extra bandwidth. If you’re happy with what you have then don’t change anything. You can be happy knowing that if you need to upgrade in the future then it is possible. For power users and those who need it and don’t want protruding antennas from PC Cards then it is worth doing as it is not an entirely expensive nor difficult to do provided that you take care and proceed with caution. I don’t have to remind you all that doing isn’t covered under any sort of warranty.
If you have comments, queries or criticisms regarding this article you may add them here or you can join the discussion about this over at the Sony TR Forums.

