Acronis True Image 7.0
Introduction
A few months ago, I wrote a glowing review for the Acronis True Image 6 backup software. Oddly enough, a few weeks after I wrote the review, Acronis released a new version of Acronis True Image. Now at version 7, Acronis True Image adds new features and essentially addresses my previous concerns with the software. If you haven’t already read that review then you may want to read it first.
What is Acronis True Image? As a refresher, it’s disk imaging software that allows you to create exact disk images of your hard disk or partitions. The difference between disk imaging software and backup software is that imaging software takes a snapshot of your actual disk or partition making an exact backup of your programs, system files, and data. Backup software simply backs up individual files.
Acronis True Image 7 supports nearly all of the modern Windows operating systems from Windows 98 onward (ME/NT/2K/XP) and supports all of the major file systems including FAT16/32, NTFS, Linux Ext2, Ext3, ReiserFS, and Linux SWAP.
Additionally, Acronis True Image 7 supports nearly every kind of backup storage you will find on the market today. This includes hard disk drives, networked storage devices, optical media (CD-R/RW and DVD±R/RW), Zip and Jazz devices/media, and P-ATA(IDE), S-ATA, SCSI, IEEE1394 (Firewire), USB 1.0/2.0 drives and PC Card storage devices.
Acronis True Image 7 Unleashed
One of the best things about Acronis True Image 7 is its consistent interface. When you first load the program you are greeted with a newly enhanced interface. If you look at it closely you will notice that Acronis has mimicked the look and feel of a typical Windows XP interface.
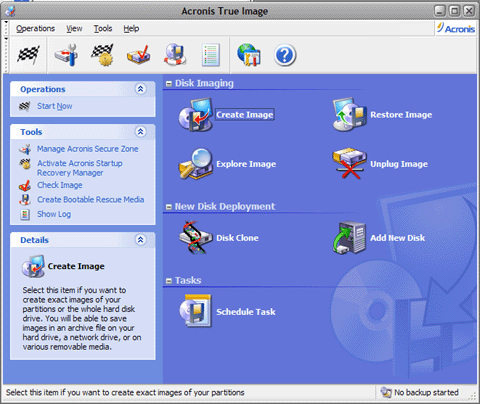
You have a task panel on the left and large well labeled icons on right. Clicking on the icons gives you a detailed description of what each component does. Clicking on any task or icon starts a wizard that takes you through the steps of your task. It’s very easy to follow and there’s always a good description of what’s going on and where you are during the process.
Disk Imaging
Like before, Disk Imaging is Acronis True Image 7’s strong suite and it’s every bit as reliable as it was before. With the new interface, taking an image of your disk is only a few clicks away. The process for creating image files is the same as version 6. The only new addition is a new screen that allows you to append incremental changes to an existing image file. I’ll discuss that in further below.
Restoration remains the same and you can restore the disks or partitions directly using the Windows interface, the Bootable Rescue Media interface, or the new Acronis Startup Recover Manager which I will also cover later. All of the interfaces are nearly identical so that you won’t get confused no matter how you’re using the program.
One of the neat things about the images you make is that you can easily mount them if you want to see what’s inside or if you need to extract a few files. All you need to do is double click on any image (.tib file) and you will be prompted with an Explore Image Wizard.
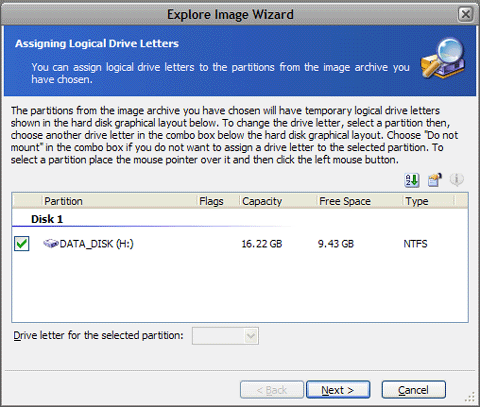
The wizard takes two clicks to mount the image as the next available drive letter. Once mounted, the image shows up in your Windows Explorer as a Read Only Drive.

You can then explore through this newly mounted virtual drive and copy files out of it simply using drag and drop. The only limitation is that you can’t add files to the image file.Other products I’ve used require you to use special viewers to see the archive files. True Image 7 integrates it with Windows Explorer making it extremely convenient and fast.
While the previous version had some great features, I was surprised by the new features that version 7 brought. The new features included the following:
- Incremental Backups
- Scheduled Backups
- Acronis Secure zone
- Acronis Startup Recovery Manager
- Image Verification Tool
- Disk Cloning and New Disk Deployment
I’ll discuss in detail why these new features are important and why they make True Image such a great product.
Incremental Backups
Previously, Acronis True Image could only make full backups of your disks or partitions. So, every time you made a new backup it would backup everything. So, if you image your systems regularly then you can run out of hard disk space quickly. With the incremental feature, True Image can make a new image file which only backs up changed files from the original image. This saves both space and time to backup.
Scheduled Backups
You can now schedule the imaging which is huge feature as you can essentially set the program to work in the background and you don’t have to worry about it. For instance, you could set it to run while you’re sleeping when there isn’t much disk activity. Setting a schedule is easy. You follow the regular steps on the kind of image you want and where you want to save it. When you get to end of those choices you will be presented with the following:
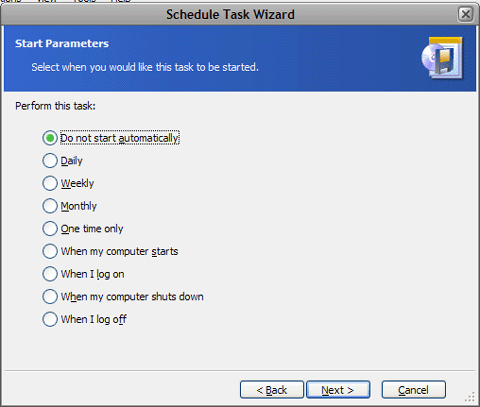
Acronis True Image 7 gives you a lot of options when you can run your imaging task. For some of the choices, you select which day and what time to run the task.
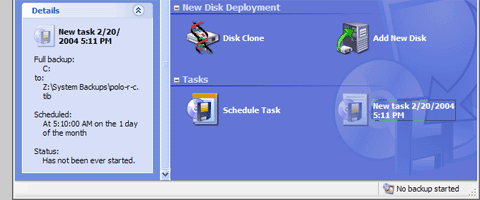
When you’ve finished creating your task you will see it in the main interface along with the details of the task. You can start, edit, rename, or delete the task as needed.
Acronis Secure Zone
This is a unique feature that sets aside hard disk space so you can save your images to the same disk. It essentially allows you to save images to a safe and separate area of your hard disk so that you can restore immediately without the need for an external backup device. This is very similar to what many notebook manufacturers offer nowadays. Essentially, you save a working (of default) image of your system on a protected partition that can’t be seen or used by the regular operating system. True Image 7 then allows you to restore your system without needing backup devices, optical media, or a network connection.
If you’re using Windows XP Disk Management software you can see the Secure Zone partition but you can’t see what’s on it. You can delete it though which you don’t want to do.
The Secure Zone can be increased and decreased in size if you find that your backups are starting to get big. You can manage the Secure Zone via True Image and can determine what partitions you want to “borrow†space from. It does require a reboot to complete the process but it’s easy to do.
Acronis Startup Recovery Manager
This feature adds a pre-boot environment so that you can initiate a recovery process without needing to create bootable rescue media. You simply need to press F11 during system boot up to access it. When used in conjunction with Acronis Secure Zone, you can restore your system to a working state without needing any extra boot CD or use it to backup your system.
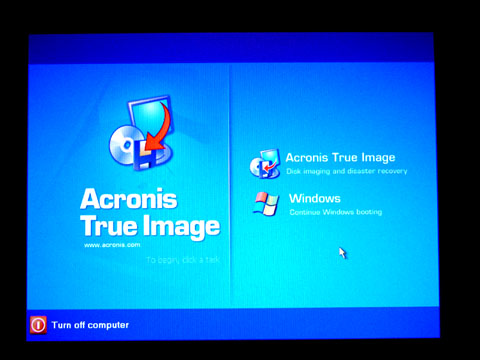
After pressing F11, you will see the following screen. The interface is as “Windows XP†like as it can get with the same dialog boxes as the regular client. This also happens to be the same interface you get when you use the Boot CD.
Image Verification Tool
If you read my last review then you’ll know that this was an important missing feature. You can now verify your images to make sure all of the data is intact. Like all of the other wizards, you simply choose the image file you want to check and Acronis True Image will verify that the data is intact.
Disk Cloning and New Disk Deployment
This is perhaps my favorite new addition. Acronis True Image 7 can now clone disks. In fact, it’s the easiest way to clone a disk or add a new disk to your system that I’ve ever seen. The most astounding part of this is that Acronis True Image 7 can clone the boot disk to another disk while you’re still in the operating system. That’s amazing!
During my tests, I decided to upgrade my main system’s drive from 80GB to 180GB. The procedure was the following:
1. Open up computer system and plug in drive to secondary IDE port
2. Boot system
3. Run Acronis True Image 7 and select Disk Cloning
4. Shut down system
5. Remove old hard disk and plug in new hard disk to primary IDE port (and plug optical drive back into secondary IDE)
6. Boot system and done.
The process was straightforward, easy and fast. Like all of the Acronis True Image 7 components, you simply follow the wizards. One could easily connect the new hard disk to an S-ATA, Firewire or USB2 external enclosure and make the clone without opening the system. Once the clone is ready then one could open the system and swap disks. This is groundbreaking because previously with disk cloning tools, you had to shut the system down and run clunky cloning tools from DOS-based operating systems.
Final Thoughts and Comments
It’s great to see that not only has Acronis fixed the few minor shortcomings of their previous version but have added a slew of new features that only makes the application more useful and a great value. Acronis’ decision to simplify the interface using common interfaces makes for an easy to use program. Underneath it all lays an extremely powerful capable program that allows one to backup/restore their system with a few clicks and no hassle.
If you thought I liked version 6 of this software then you won’t be surprised by how much I like version 7 of Acronis True Image. For the extremely reasonable price of $49.99, you get a lot of value. Anyone who’s concerned about having a stable, reliable means of backing up their system should pickup a copy of this software.
You can find out more information about Acronis True Image at http://www.acronis.com/products/trueimage/.

