silicon pop culture!

  • blog
  • articles
  • about
  • forum
  • search
  • Forum Home  \  Sony VAIO TR  \  Hardware  \  Thread
Welcome Guest
Login  ·  Register  ·  Member List  ·  Search
Username Remember Me? 
Password   forgot password? 
   
1 of 5
1
2
3
Next
Last »
Replacing hard disk - step by step with pictures
 
pugwash75
Posted: 11 November 2005 11:31 PM   [ Ignore ]  
Master of Fn Combos
Rank
Total Posts:  114
Joined  2004-11-15

I know that unsoldering chips from the motherboard is chickenfeed to a lot of people here, but I suspect there are plenty of people (me included) who wouldn’t know one end of a capacitor from the other, but still want to swap the hard disk from their TR when it keels over or they fancy a bigger one. So… here’s an idiot’s guide to getting the hard disk out, with far too many pictures. Many thanks to pebird and rbenech for helping with updates - please note that you don’t need to read the rest of this thread in order to perform the procedure; as corrections have been posted I’ve changed the original.

The machine I am taking apart is a European PCG-TR1MP. I would imagine that this guide will be fine for any TR, as they’re pretty similar under the lid. The only tool you will need is a set of precision screwdrivers.

Just a quick preamble… there are two types of hard disk that the TR shipped with - a Toshiba one and a Hitachi one. You can find out which one you have by hitting F2 while the machine boots (before the “Loading Windows” screen) and expanding “Hard Disk Drive” on the “Boot” tab. You should replace the hard disk with another model from the same manufacturer - the cable that connects them to the motherboard is different, so if you don’t, you will need to buy another connector. Currently the largest capacity 1.8” Toshiba drive available is the MK6006GAH (60Gb) and the biggest Hitachi one is the C4K60 (also 60Gb). If you are buying a drive, make sure you don’t buy the “SLIM” C4K60 model as it has a different connector. I’m using the C4K60 one here - the Toshiba one actually has a much simpler interface connector once you get it out.

OK, here we go.

1. Back up all your data. We’re going to do a from-scratch restore - once the disk is out you’re going to have no way of getting anything off it. Find your Sony restore CD.

2. Take the battery off. Remove anything you have in the CF slot. Unplug any external connectors.

3. Prize off the two rear rubber feet. I did it with a flat screwdriver. Usually one side is stuck down slightly better than the other.

4. Undo the twelve screws marked here. Five will be shorter than the others - I’ve circled them yellow. It’s possible that some of these twelve don’t actually need to be undone - if someone lets me know I’ll amend this. I undid them all, and nothing bad fell off.

1.jpg

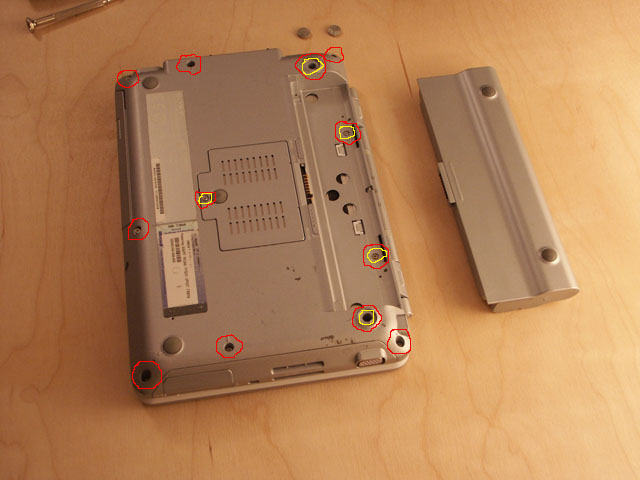
5. Remove one more screw from underneath the memory card cover.

2.jpg

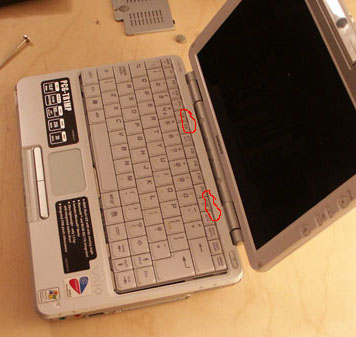
6. Turn the laptop back over, being careful to catch any screws you couldn’t get out. There are two little plastic clips that hold the top of the keyboard down. They’re above the F6 and F11 keys, as shown here.

3.jpg

Push them back with a flat screwdriver and lift the keyboard from the back with your nails.

7. The keyboard is attached to the motherboard by a ribbon cable - on the connector there’s a little brown tab to the right of the ribbon cable. If you lift this up, the ribbon cable will slide out.

5.jpg

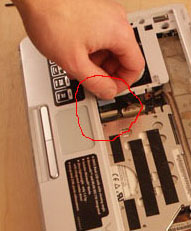
8. Righty, keyboard off. Are you nervous yet? There’s another screw you will have to undo at the top left of the case, as shown here.

6.jpg

9. There’s a little ribbon cable which attaches the touch pad to the motherboard - it’s got a small blue tab attached to it. Give that a pull (as shown here) and it’ll come out.

8.jpg

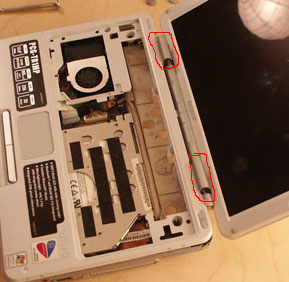
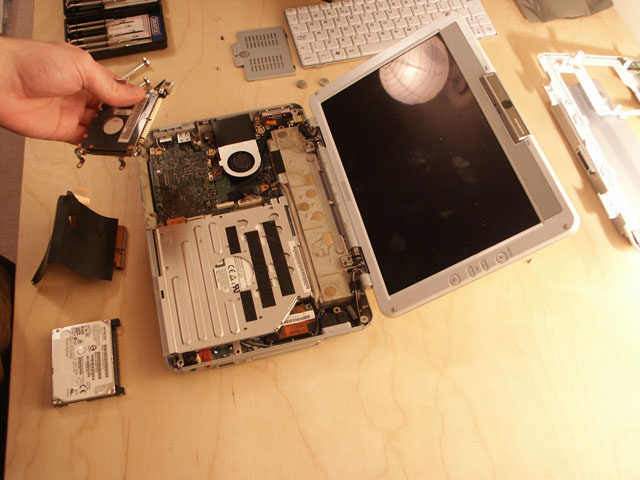
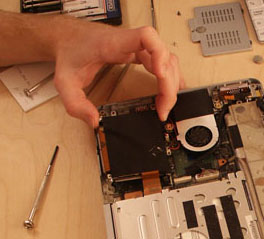
10. The cover is now ready to come off. It lifts from the back - you might find that you have to squeeze it past the parts where it connects to the screen a little, highlighted here.

7.jpg

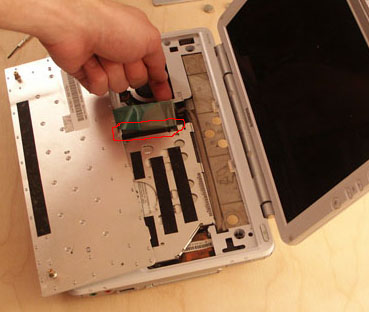
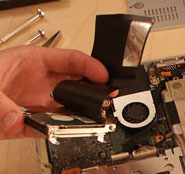
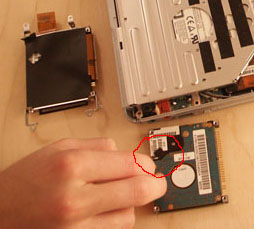
11. The hard disk is the black blob at the bottom left. There’ll be one short screw left to undo, at the bottom left, as shown here.

9.jpg

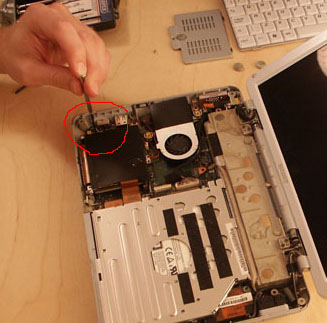
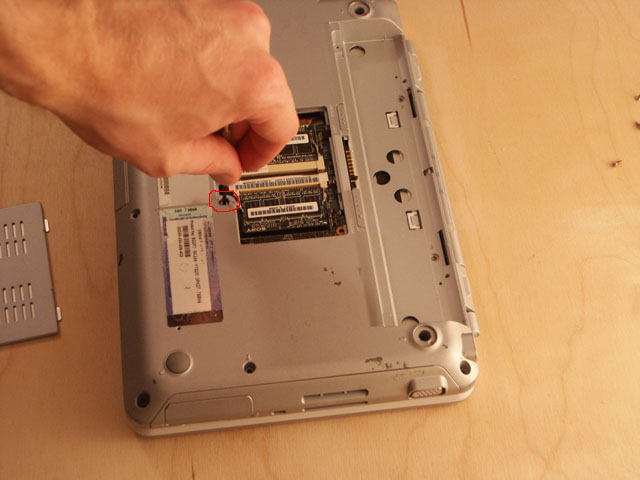
12. The interface cable for the HD joins the motherboard just to the right of the HD. Pull this plug out - you may need to carefully prize it up with a screwdriver a little before you can lift it with your fingers.

10.jpg

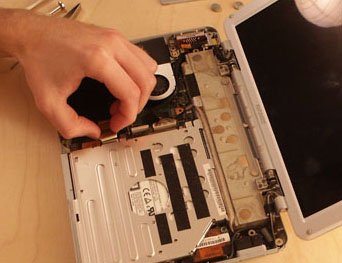
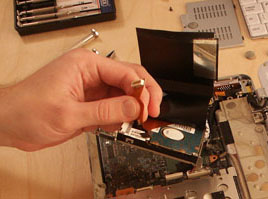
13. Yay! The hard disk will now lift out. Remember how much this thing cost? And look at it now, just a big bunch of screws and some cables. And you took it all to bits based on some instructions you read on the internet, from someone who even ADMITTED they’d never done it before. Well, it’s too late now.

14. The hard disk is surrounded by a bit of black plastic - carefully unpeel this, starting at the end that doesn’t have the HD connector on it. Don’t tear it - you’ll need to put it back onto the new disk.

12.jpg

15. Whilst unwrapping the HD, the interface cable will also be glued on - carefully prize this off too.

13.jpg

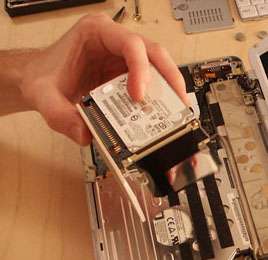
16. OK - the hard disk is now out. Carefully remove the interface cable from your old HD (again, you might need the screwdriver - don’t lift one end of it first and then the other - try to remove it evenly so as not to bend any pins). Remember which way up it went. You did remember, right? You didn’t remove it, put it on the table and go back to this guide?

17. The HD has two little brackets on either end - remove these and put them onto the new HD. Make sure that you put them on the correct ends, and that you put them the right way up - in a couple of these photos mine are on the wrong ends (I had to swap them about) so don’t look too carefully for my advice. Remember I am just some guy on the internet who admitted he’d never done it before. It’s partly your own fault.

14.jpg

18. Put the interface cable onto the new HD. Make sure it’s the right way up. Don’t press it in with your fingers, as it’ll hurt as much as it did when I did it. Push it with something else - a pad of paper or something, as I’m doing here.

15.jpg

19. There’s a little rubber pad attached to the old hard disk (at least there was on mine) which tallies up to a small square hole in the black plastic that wraps the disk. Prize it off the old disk…

16.jpg

... and put it onto the new one.

20. The new disk is ready to go in - make sure you slot the right-hand end in first, because there’s a little notch that the top-right foot has to go into.

17b.jpg

21. OK - you’re pretty much done. Keep paying attention though, so you don’t forget to put all of the screws back in (like, ahem, I did).

22. Put back the bottom-left special small hdd screw in the disk cradle (removed in step 11).

23. Push the drive connector back down.

24. Put the top cover back on (front-first).

25. Reattach the top cover ribbon cable (removed in step 9).

26. Replace the long screw in the top left of the case (removed in step 8 ).

27. Re-attach the keyboard ribbon cable, remembering to clip down the connector that holds it in (removed in step 7).

28. Put the keyboard back on, bottom first, making sure the two clips above F6 and F11 snap into place to hold it down.

29. Turn the laptop over, and replace the small screw inside the memory compartment (removed in step 5).

30. Replace all twelve screws in the bottom of the machine (removed in step 4 - use the picture in step 4 to ensure you put them back in the right places).

31. Make yourself a stiff drink.

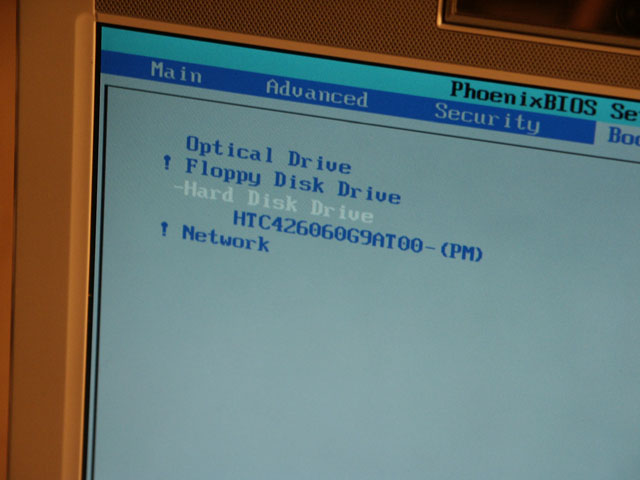
32. Turn on the laptop. Hit F2 quickly to enter the setup program. Go into the “Boot” section and expand “Hard Disk Drive”. Whatever happens, you should see something in there. If you fitted the 60Gb Hitachi drive, you’ll see:

18.jpg

33. Take a well-deserves swig of your stiff drink.

34. Turn the machine off again, and glue the rubber feet back on. Use fairly weak glue, or a very small amount of strong glue. You never know when you’ll need to take them off again.

35. Insert the Sony Restore CD, and boot from it. You’re done.

That’s it - if you find this useful or have any comments, please let me know. I know this is quite a simple procedure but I’ve learned a lot from reading this forum and I was quite keen to give something back, even if it was something a tad basic :oops: .

Chris

Profile
 
 
hsony
Posted: 12 November 2005 07:45 AM   [ Ignore ]   [ # 1 ]  
Embryo
Rank
Total Posts:  24
Joined  2005-09-20

Thank you, Thank you.

Profile
 
 
cheerioboy
Posted: 12 November 2005 05:01 PM   [ Ignore ]   [ # 2 ]  
Talented Mobile Companion
Avatar
Rank
Total Posts:  35
Joined  2005-09-23

awsome—i could have used this~  raspberry

 Signature 

Sony TR3A—2 gigs RAM—Dvd burner—bluetooth—32gb SSD—and a working camera again!

Profile
 
 
pebird
Posted: 11 February 2006 03:58 AM   [ Ignore ]   [ # 3 ]  
Embryo
Rank
Total Posts:  5
Joined  2006-02-11

This is a great post - thanks - worked like a charm.

One small addition.  The reason you need to use the same hard drive manufacturer is for the interface cable / ribbon.

I was fortunate enough to inherit a TR1/B from a friend for parts - the Toshiba 60GB worked fine since I had the interface cable, even though my TR3AP originally had a 40GB Hitachi.

The Toshiba connector is more straight-forward, like a regular laptop harddrive connector - the Hitachi is the wrapped-around black thing in the picture - the strangest interface connector I’ve seen.

Funny, the Toshiba had a black sheet of plastic stuck on the top of the drive, where the label is - may be for heat?

Thanks again.

Profile
 
 
pebird
Posted: 11 February 2006 04:29 AM   [ Ignore ]   [ # 4 ]  
Embryo
Rank
Total Posts:  5
Joined  2006-02-11

Also, on the screw sizes - the short ones are mislabelled - there is one short screw on the memory cover, the other four go across the back - 1 in each corner and the other 2 in the battery compartment.

Profile
 
 
pugwash75
Posted: 14 February 2006 04:47 AM   [ Ignore ]   [ # 5 ]  
Master of Fn Combos
Rank
Total Posts:  114
Joined  2004-11-15

Many thanks pebird - I’ve corrected the original article to mention the connector differences, and changed my photo to show the right short-screw positions.

Chris

Profile
 
 
drboom
Posted: 17 February 2006 08:30 AM   [ Ignore ]   [ # 6 ]  
Embryo
Rank
Total Posts:  6
Joined  2004-06-16

thanks for this post.  My hitachi just died and the detailed post was very helpful in the replacement.
On a related note, I ended up with an extra screw - I forgot to put back the screw from step 8.  Does anyone know what that holds in? I’d prefer not to take everything apart again if it isn’t terribly important.

Profile
 
 
pugwash75
Posted: 19 February 2006 04:21 PM   [ Ignore ]   [ # 7 ]  
Master of Fn Combos
Rank
Total Posts:  114
Joined  2004-11-15

[quote author=“drboom”]thanks for this post.  My hitachi just died and the detailed post was very helpful in the replacement.
On a related note, I ended up with an extra screw - I forgot to put back the screw from step 8.  Does anyone know what that holds in? I’d prefer not to take everything apart again if it isn’t terribly important.

Glad you found it useful! If I recall correctly that screw is the only one that holds the lid down, so I suspect you’ll be fine as long as you don’t hold it upside down and shake it vigorously. I’d just wait until you have to replace the MotionEye and put it back then.  rolleyes

If it’s any consolation, I forgot that exact screw as well and had to take it apart again and re-take all the photos.  :oops:

Chris

Profile
 
 
zacbraak
Posted: 02 March 2006 12:07 PM   [ Ignore ]   [ # 8 ]  
Embryo
Rank
Total Posts:  1
Joined  2006-03-02

on my tr3a the small screws went in under the battery, on the memory cover, and under the gromits for the keyboard.

If you put the long screws under the gromits, the keyboard will be loose at those corners.

Profile
 
 
pugwash75
Posted: 02 March 2006 04:12 PM   [ Ignore ]   [ # 9 ]  
Master of Fn Combos
Rank
Total Posts:  114
Joined  2004-11-15

[quote author=“zacbraak”]on my tr3a the small screws went in under the battery, on the memory cover, and under the gromits for the keyboard.

If you put the long screws under the gromits, the keyboard will be loose at those corners.

If I’m reading this correctly, my now-updated diagram at the top is correct - am I?

Chris

Profile
 
 
zagu
Posted: 15 April 2006 09:02 PM   [ Ignore ]   [ # 10 ]  
Embryo
Rank
Total Posts:  5
Joined  2006-04-15

hi guys and gals. I have a question. My 1.8” Hitachi Hard disk is slowly dying. I was just wondering if i get any hitachi 1.8” Hd would the connector be the same as the one inside my tr3A laptop? and another question if i change the hard disk of the laptop that means all drivers/windows XP will be deleted how can i put this on myh new HArd disk? im scared that if i installed the new HD on my tr3A the drivers for the built in webcam,ETC cant be detected thus making the webcam and other components useless. Thanks for the help more power to you guys! keep up the good work smile

Profile
 
 
rabbitinlights
Posted: 16 April 2006 07:43 AM   [ Ignore ]   [ # 11 ]  
Embryo
Rank
Total Posts:  29
Joined  2006-04-06

Sony Link

Above is a link to the sony website which has all the software/drivers for your model. When you install your new HDD its going to be blank, you will either need your recovery CDs or a copy of XP Pro to do a fresh install. Im sure you have already done this, but back up everything onto CD/DVDs as the old drive will be useless, unless you get an enclosure for it to transfer it back onto the new drive.

Good luck.

S.

Profile
 
 
Gundam
Posted: 16 April 2006 08:16 AM   [ Ignore ]   [ # 12 ]  
Master of Mobility
RankRankRank
Total Posts:  340
Joined  2005-12-30
[quote author=“zagu”]hi guys and gals. I have a question. My 1.8” Hitachi Hard disk is slowly dying. I was just wondering if i get any hitachi 1.8” Hd would the connector be the same as the one inside my tr3A laptop? and another question if i change the hard disk of the laptop that means all drivers/windows XP will be deleted how can i put this on myh new HArd disk? im scared that if i installed the new HD on my tr3A the drivers for the built in webcam,ETC cant be detected thus making the webcam and other components useless. Thanks for the help more power to you guys! keep up the good work smile


Yes the connectors are the same and refer to this guide http://www.siliconpopculture.com/sonytr/viewtopic.php?t=807

Profile
 
 
cslima
Posted: 19 May 2006 05:32 AM   [ Ignore ]   [ # 13 ]  
Embryo
Rank
Total Posts:  1
Joined  2006-05-19

Chris,

Thanks a lot for your post. My TR3AP’s Hard Disk (Hitachi 40GB) died. It started with strange noises and eventually was no longer able to write or read. Finally, the “OPERATING SYSTEM NOT FOUND” message appeared.
I bought a new HITACHI 1.8” 60GB and followed your step-by-step instructions and worked perfectly.
I’m sure I wouldn’t be able to do so without it.
Again, thanks a lot.

Cheers,
Carlos.

Profile
 
 
dustrho
Posted: 12 June 2006 09:10 AM   [ Ignore ]   [ # 14 ]  
Master of Fn Combos
Avatar
Rank
Total Posts:  115
Joined  2004-07-01

I would really like to upgrade my 40gb Hitachi drive with a larger one, but is 60gb still the largest capacity available? And where can I buy one, because I’ve had a hard time finding a 1.8” hard drive that’s made by Hitachi.

LMK… thanks!

 Signature 

Chris Rhoads
http://www.sandtroopers.com

Profile
 
 
caseyatbt
Posted: 12 June 2006 09:50 AM   [ Ignore ]   [ # 15 ]  
Master of Fn Combos
Avatar
Rank
Total Posts:  110
Joined  2004-07-27

[quote author=“dustrho”]I would really like to upgrade my 40gb Hitachi drive with a larger one, but is 60gb still the largest capacity available? And where can I buy one, because I’ve had a hard time finding a 1.8” hard drive that’s made by Hitachi.

LMK… thanks!

I found a 60gb on eBay a couple weeks ago.

jc

Profile


1 of 5
1
2
3
Next
Last »
 
‹‹ whats the deal with Bluetooth 2.0?      Emergency help needed- the chief of police is here! ››
Script Executed in 0.4975 seconds
RSS 2.0     Atom Feed
© 2003-2007 siliconpopculture.com

xhtml 1.0 transitional valid!  Creative Commons License  Powered by ExpressionEngine  Add to Technorati Favorites extremeTracking title=

eXTReMe Tracker