Sony TR Bluetooth Upgrade
Introduction
For some reason, when it comes to bringing the latest and greatest Japanese technology over to the United States something always gets lost in the translation. This isn’t always the case but it seems to be true in many cases.
Case in point, the original Sony TR (specificially TR1/B) notebook released in Japan had Bluetooth and 802.11a/b functionality built-in. The original US release had the Bluetooth and 802.11a functionality removed. One could argue that Sony removed those pieces to lower the cost but I don’t buy it. First of all, the TR isn’t really affordably priced and most people who are in the market for are willing to pay a premium for Sony technology.
Even though I’m a huge fan and user of Bluetooth technology, I did not want to import a TR since I didn’t feel that the price premium (~$500USD at the time) was worth it also considering the memory specs were lower than the US released model. So, I bought a Sony TR1AP for a great price and figured I would make do with Sony’s diminutive USB Bluetooth adapter.
Now, I really like the Sony Bluetooth USB adapter save for a few issues with compatibility with some items; however, the hassle of plugging/unplugging it really started to bother me. It’s easy to carry around as it’s on my keychain but sometimes I needed to a quick connection and I had to dig in my pockets for the adapter.
So, I had been pondering and internal Bluetooth upgrade for a while. I researched everything from internally installing a USB adapter inside the system (losing one USB port in the process) to finding the actual part.
A Blind Guess
I spent weeks trying to find the service manual for any Japanese (TR1/B, TR2/B) or UK (TR1MP) so that I could find out the part number. I have the US TR1A/AP manual which actually shows where the Bluetooth module goes but of course, no part number is mentioned. After having absolutely no success finding the part I was ready to give up. Then, one day I was checking out Sony’s website and saw that they had released new Sony Z1VA thin and light notebooks. I was immediately intrigued by the new refresh of these products as the higher end models (Z1VAP1/Z1VAP2) had Bluetooth built in.
Hmm…(wheels turning inside my head)…I wonder if Sony uses the same Bluetooth module inside the Z1 as the TR. It would make sense wouldn’t it? It’s cheaper for Sony to re-use parts in order to keep their costs down.
So, with that in mind I immediately went over to SparePartsWarehouse, a site I had visited before when looking for notebook parts. Doing a search for the Z1VAP1 resulted in a list of all of the parts of that system. Lo and behold!
1-234-803-21 Bluetooth Module (Official Sony Part Number).
At this point, I was cautiously excited. Sure I found the part but was it the right one? Because it’s a special order item I had to call them to get a price quote.
$115 USD.
This is where I struggled with it. I didn’t want to spend $127 (with shipping) on something that may not work with my system. I don’t think I could return it either so it was a crap shoot. I actually spent a week thinking about it and then decided to place the backorder.
A few weeks later I got a notification that the product was en route to me and I waited with anticipation.
Upon receipt of the package, I tore up the box to find a tiny little box. Immediately, a huge grin came across my face.
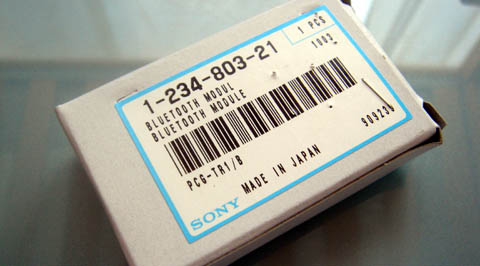
As you can see, the box clearly says Bluetooth module and PCG-TR1/B which really got me excited. I no longer had to worry about if I had the correct part or not. I knew it was going to work!
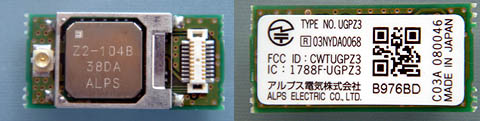
Here’s some pictures of the Bluetooth module which is the size of a chiclet. You can see that the actual part is made by Alps, the same company that makes touchpads.
I found out that you can also order this part from Sony Direct Accessories & Parts Center (DAPC).
Other things you need to know
In addition to the Bluetooth module, there are other pieces that are needed in order for the device to work properly. When I received the Bluetooth module I noticed that it had an antenna connector. I also knew that the daughterboard also had one of these connectors. I hadn’t thought to order that part and again, I didn’t know what part it would be anyways. I did know that it’s a mini coaxial cable using U.FL type connectors.
Looking at the Z1VAP1 parts list I suspect the part number is 182726621 but I can’t confirm it. This part costs around $25 (not including shipping).
At any rate, SparePartsWarehouse didn’t have it in stock and I didn’t want to wait a couple more weeks for the part so I decided to look up a third party source. This was almost fruitless until I came across DigiKey. DigiKey sells all kinds of electronics components and happened to have the cable I was looking for. The cables are made by Hirose. There were a lot of different cables available and although I ordered the right part, I did accidentally order one that was unnecessarily long. I though I ordered the 200mm cable but it turns out I ordered the 500mm cable.
The part number I ordered was CABLE ASSEM UFL-UFL 500MM 1.13 with a part number of U.FL-2LP-5016-A-(500) or H9167-ND. You probably don’t want such a long cable as 200mm will be more than long enough. The part number for that is U.FL-2LP-5016-A-(200) or H9166-ND.
One nice thing about these Hirose cables is that they cost less than $9 and they work. If you’re going to order the part then I recommend getting the 200mm part. The 500mm part works but is excessively long.
You need the cable. I thought I might be able to get around not having it but the transmitter will only reach 8-9 inches before you lose a connection. 8 or 9 inches is basically useless.
Even with all of the working hardware parts, the thing that makes everything work is the software. I initially had some problems finding the right software but I was pointed in the right direction from one of the helpful Sony TR World forum members. You’ll want to download the following installation package:
ftp://ftp.vaio-link.com/pub/Vaio/Bluetooth/BTD_ASS_100S_UK.exe
Weighing in at 15MB, this should have everything you need to install the device. It includes the device driver, Virtual COM driver, Wireless Switcher Utility, and the Bluespace NE 3.3 software.
Note: I have found that you cannot simply install the above software as is. You will need to install everything one piece at a time. The Bluespace NE 3.3 software and Wireless Switcher Utility software are standalone as it is. The driver software is hidden inside of the SONY.PAC file located in the archive. You will need to extract the files from here to get to the device and VCOM drivers. You can use the KCAP.EXE software to extract the files. The command would be like the following:
kcap SONY.PAC c:temp
This will extract several directories into C:TEMP. The most important files are VCOMM and MS. MS has the actual driver while VCOMM is the com port software. If you don’t have KCAP.EXE do a search on Google for it. You should be able to find it. Also, when you run it from the command line it won’t tell you that it’s doing anything. It simply returns a prompt. That’s normal. You should notice your hard disk light flashing like crazy as it’s extracting the files to wherever you pointed it to.
Lastly, you will want to make sure that your Windows XP installation has all of the latest service pack updates required to support Bluetooth. If you already have installed the PCGA-BA1/A then you should have everything you need. If you’re not sure, you can look in the QFE directory that’s extracted from SONY.PAC and install all of the updates manually.
Installation
I’m going to copy part of my Netegriti review for the basic opening instructions. First of all, before I start. Please know that this procedure is not for everyone. I do not take any responsibility if you damage your system in any way. If you are not experienced with tinkering with computers and using the proper tools and grounding techniques then I suggest you take a lot of care if you try to follow these instructions.
The first thing you will need is a thin flat head screwdriver, two Philips screwdrivers (one small and one really small) and a pair of needle-nosed pliers.
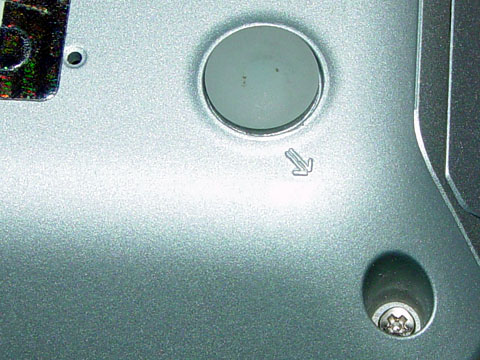
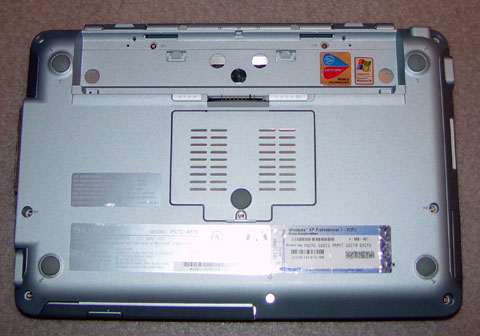
The first step is to remove all of the screws on the bottom of the TR. All of the necessary screws are denoted with the following arrows. You will need to remove two of the rubber feet in order to get to two of the screws. Use the flathead screwdriver to peel them off and place them on a surface where dust will not get on the adhesive part. The adhesive is pretty good and will allow you to stick them back on without too much trouble.
In total, you will remove 13 screws from the bottom of the system. I suggest you remove the screws one by one and place them on a sheet of paper that has the location of where that screw came from. This will help you avoid having stray screws at the end.
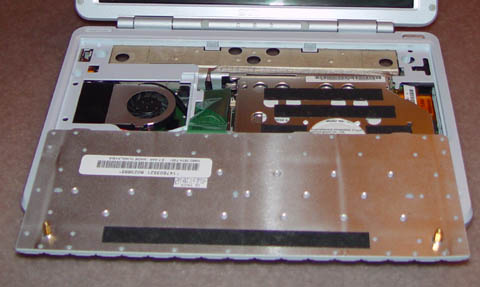
With all of the screws removed you will see two plastic latches in the battery bay. Hold the TR upside down and gentle push the latches upwards and you will feel the keyboard pop outwards.

Turn the notebook over and the keyboard will fold over allowing you to see the insides of the system. The keyboard is held in the system via an interface ribbon. Using your flathead screwdriver, lift the brown plastic tab upwards towards you and the interface ribbon will slide out with ease. You can then put the keyboard aside for later.
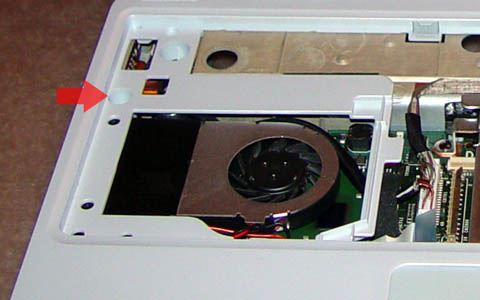
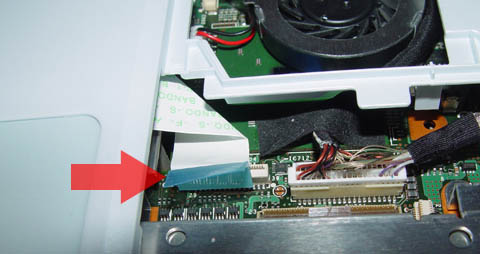
The thing to do is remove one more screw as denoted in this picture. Removing this screw will allow you to remove the rest of the plastic frame and further access the insides of the TR. You must remove one more interface ribbon; however, this ribbon is only pushed in. Gently pull on the blue colored tab and it comes out easily. Now you can remove the frame. The key to getting it off is working on the top part first where the plastic connects to the LCD display.
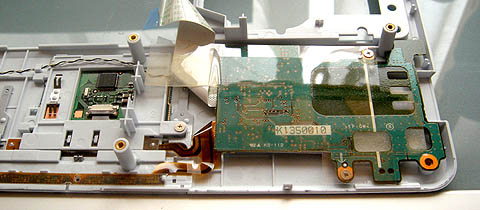
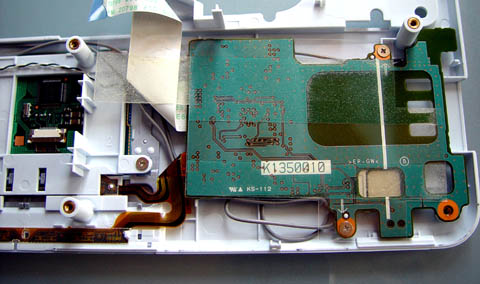
Now, examine the underside of the plastic frame. You will notice that there is a daughterboard on the right side. There are two screws that hold the daughterboard in place. Both are most likely under a protective film.
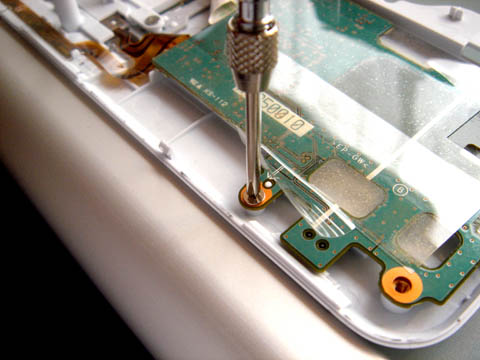
Gently lift up the film and unscrew both screws. Now, notice that there is a ribbon on the left side of the board. Gently fold the daughterboard over so that you’re not tugging on it.
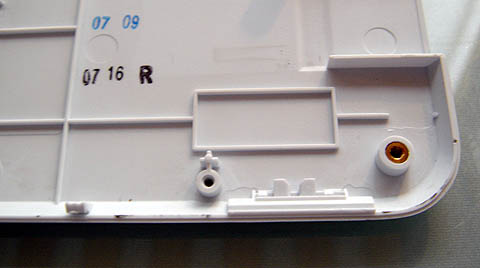
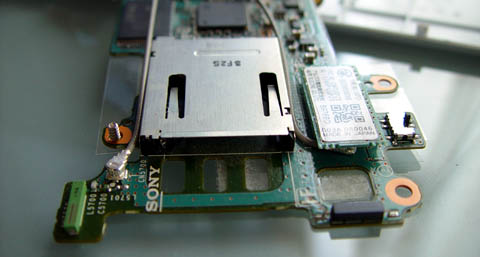
You’ll also notice that once you turn the daughterboard over you can see there is a space in the plastic frame that accomodates the Bluetooth module.
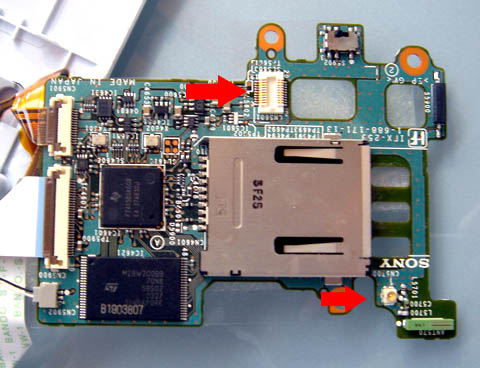
You can see the Bluetooth module connection point and the antenna connector points noted in the photo. The next part is relatively straightforward. The first thing you want to do is plug in the antenna cables.
Now, gently plug in the module into the slot. Take care to make sure that the antenna cable isn’t blocking the memory stick slot. You should be able to snake the cable around to avoid it. I suspect that you may not have this problem if you order the official Sony part since it will probably be a perfect fit. I can neither confirm nor deny this since I didn’t order the Sony part. Your experience may vary here. I had to sneakily fold my extra long cable to fit under the left side of palm rest because mine was too long. You definitely want to keep it on the daughterboard side since there’s no space on the right side over the optical drive. I tried it and it makes it stick up a little.
With cables plugged in and module connected, put the daughterboard back in place. You will want to make sure that it’s fully flush like it was before.
Reassemble your system making sure you put everything back the way you found it. As you can see, even though my cable is long I managed to snake it around the internals while allowing everything to go back to their original locations and fit.
When you next power up your system you will see a new blue light between the Wireless LAN and Memory Stick LEDs; however, don’t power it up just yet.
Software Installation
You don’t actually have to follow these steps exactly as it really doesn’t matter. I have just put this here as a practical guide.
1. Turn off your Wireless by moving the switch to the off position.
2. Boot up your system
3. If you haven’t already done so, unzip Bluetooth software and extract all of the components.
4. Turn on your Wireless Switch
5. Windows XP should immediately find a new hardware device. When prompted for the driver, point it to the location where you extracted the SONY.PAC files. You will want to point it to the MS directory. It should load up the drivers without any fuss. You can verify the installation by checking your Device Manager. You should see the following:
6. Now that you have Bluetooth installed, install the VCOMM software.
7. Next, install the Wireless Switch Utility.
8. Lastly, install the Bluespace NE 3.3 software.
If you follow these directions you shouldn’t have any problems I can forsee.
The Wireless Switch Utility allows you to turn the Bluetooth and/or Wireless LAN features on or off via software. It adds a little icon to your task bar which brings up this dialog box.
You can confirm the software works as the lights on the front will be on or off depending on your choices.
Bluespace NE 3.3 is a newer version of the Bluespace software for more conveniently connecting Bluetooth devices. It actually isn’t necessary for Bluetooth operation as Windows XP has built-in abilities. It just makes it a little easier to use.

I won’t go into this as you can go into the help files to learn more about it. People who have the Bluetooth USB adapter will be familiar with this. This newer version does have a slightly re-done interface and seems to support more types of services.
Final Thoughts
So, North American Sony TR users who need integrated Bluetooth can rejoice as it is possible to install it internally with a little patience and ingenuity! It works extremely well and happily connects to my other Bluetooth devices (other computers, my cell phone, my PDA, and my headset) with ease. It’s essentially equivalent to the PCGA-BA1/A but with more convenience as it’s internal and can be turned on and off with a flick of a switch or via software.
I’m going to assume that there will probably be a small difference in power consumption when the Bluetooth is in use. I will possibly look into this further at a later date but probably not as the benefit of having it outweighs any battery concerns.
Performance is good and I’m routinely able to connect to my phone from 15-20 feet away which is perfect for my personal area network!
I may go back and order the Sony cable as well…but probably not since what I have is working.
So, ultimately, this project cost around $150 with shipping included which is a premium for Bluetooth considering that you can get USB adapters for like $30. Of course, having it integrated is worth the additional cost as I’m sure most Sony freaks like myself can attest to.
If you need more information about this or want to discuss it further, you can comment here or visit the thread about this on the Sony TR World Forums.

